This tutorial is about how to rip and convert DVD to Oculus Rift videos so that you can enjoy DVD movies on Oculus Rift without the limitations.Rift is unlike anything you've ever experienced. Whether you're stepping into your favorite game, watching an immersive VR movie, jumping to a destination on the other side of the world, or just spending time with friends in VR, you'll feel like you're really there. Imagine how wonderful if you can view your all DVD collections with VR headsets, well, come with me to get the magic recipe of making use of all your DVD movies with Oculus Rift CV1 for VR experience. In order to get DVD files onto Oculus Rift CV1, what you need to do is to rip DVD to Oculus Rift CV1 compatible videos (the Oculus Rift CV1 by default supports most common file formats including MP4, AVI, and FLV). Here Dimo Video Converter Ultimate is highly recommended to help you do the job.It can professionally rip DVD to Oculus Rift CV1 supported video format with fast speed and excellent output quality. In addition, this DVD ripping tool can also convert DVD to various popular video formats like AVI, MP4, WMV, MPEG, MOV, FLV, MKV, 3GP, etc. as well as rip DVD to optimized video for playback on iPad, iPod, iPhone, Gear VR, Android tablet, Xbox 360/One/One S, PS3/PS4/PS4 Pro, Galaxy Tab and more. If you are a Mac user, you can turn to Rift CV1 DVD Ripper for Mac (OS Sierra included), which has the same function as the Windows version. Now download the right version and follow the tips below to finish your task.Free Download Dimo Video Converter Ultimate:
 Other Download:
How to rip DVD for playing on Oculus Rift CV1Step 1: Add DVD moviesLaunch the top DVD to Oculus Rift CV1 converter, add your DVD files by clicking the "Add DVD" icon. ISO and DVD folder are also supported.
Other Download:
How to rip DVD for playing on Oculus Rift CV1Step 1: Add DVD moviesLaunch the top DVD to Oculus Rift CV1 converter, add your DVD files by clicking the "Add DVD" icon. ISO and DVD folder are also supported. Step 2: Select a suitable output video formatAs we mentioned above, Oculus Rift CV1 supports MP4, AVI, FLV, etc format. You can click the "Select ormat" bar and choose one from "Format > Video" list. Or select customized profile for Oculus Rift offered by this top VR video converter from "Device > VR".Step 3. Select 3D modeClick "Edit" and in the video editor windows, turn to "3D" tab and then choose "Left-Right" effect.
 Step 3: Video encoding settingsBy clicking the "Settings" button, you can modify the video/audio parameters. For ripping DVD to view on Oculus Rift CV1, 2D/3D videos for the Cinema app should be in 720p (1280*720) with a higher bitrate around 5mbit/s. Higher resolutions for the specific format doesn't make the quality better but are a waste of power and battery life.
 Step 4: Start to rip DVD to Oculus Rift CV1The last step is to press the big "Start" button on the right to start converting DVD files to Oculus Rift CV1. The conversion takes a few minutes, after conversion, you can click "Open" to locate the output videos. Then you can transfer and play videos on your Oculus Rift CV1 from your VR video player app. Here is the list of Oculus Rift video players that you could find. If we missed any, do contact us and we’ll add it.1. Total Cinema 360 Oculus PlayerThis player has a good customer support, followed by a lot of features at which you can take a peek on their official website. Apart from watching video in full 360 degrees, it lets you experience videos on the web from both desktop and mobile browsers. Download here.2. LiveViewRiftSay hello to one of the most popular DK2 video players. It is on top of the list for many people, and for a good reason. It perform superbly, has a solid tracking, and has no performance issues. It is my second favourite Oculus Rift video player. Download here.3. VR PlayerVR Player is a known program amongst Oculus Rift veterans. Although I would not recommend using it with DK2 (as it has some performance issues), it is one of the best video players available for the first Oculus Rift development kit. Download here.4. CINEVEOCINEVEO is a bit of a controversial app. Its creator, Sven Kohn, had some dishonorable ways to market his program, as well as having a bad customer support. Due to these incidents, CINEVEO has been blacklisted in vrapps & EnterTheRift.fr. You can read more about the incident here on reddit. Price is $9.99. 5. MaxVRMaxVR does everything that you ask him to. There are no complications with this program. Although some features might be missing, it can be seen as something positive. It is one of the most simplistic players that doesn’t confuse their users. Download here. Price is $9.99.6. RiftMaxRiftmax has also its own spin to all these video players. Apart from watching movies and everything you want, you are able to invite friends or join parties, like in Convrge. To make the best of this social interaction, you can use your spotlight to sing some karaoke to others. Download here.7. Kolor EyesThis one has a lot of functions to offer. Apart from watching 360 videos, you can experience movies online, and have an opportunity to connect your Apple or Android devices with your VR headset (GearVR implied). More information here.8. WhirligigWhirligig has been praised for its smoothness. No judder is a big plus, especially when watching movies for hours on end. Some people even have named Whirligig as one of the best Oculus Rift video players available. Download here.9. Virtual DesktopFinally, this one is my favourite. Although LiveViewRift is pretty close in terms of first place, I prefer this one over anything else. Virtual Desktop has all the necessary functions, performs well and lets you watch Youtube 360 videos with an Oculus Rift (click for guide). Download here.10. VorpXWith the latest updates, vorpX is not only making itself one of the leading VR injection programs, but adds extra functionalities like video player options to user menu. Apart from just watching regular movies, you can now enjoy 3D movies, as long as they are in VLC and MPC-HC format. Download here. Price is $39.11. VLCRiftPlayerVLCRiftPlayer is a simple program that does its job well. It is also one of the few video players for Oculus Rift that lets you add subtitles since they’re built directly into VLC. Download here.Free Download or Purchase Dimo Video Converter Ultimate:
 Contact us or leave a message at Facebook if you have any issues.Related Articles:
Source: How can I Put DVD to Oculus Rift CV1 for Movie Enjoyment
Contact us or leave a message at Facebook if you have any issues.Related Articles:
Source: How can I Put DVD to Oculus Rift CV1 for Movie Enjoyment
DIMO DVD to YouTube converter helps you convert DVD movies to videos for YouTube, before you can upload DVD to YouTube for sharing.YouTube was created in 2005, but much like Google, it feels like it's been around forever. We post our videos on YouTube, look for some silly entertainment during boring afternoons and send videos along to friends much like old ladies used to spread gossip around town not very long ago. We'd accept the truth- YouTube doesn't support DVD format directly.  According to YouTube Help Center, H.264 video with AAC audio in MOV or MP4 format is preferred for uploading. Thus, to share DVD movies on YouTube, you need to rip DVD to YouTube H.264 MP4 or MOV first. Dimo Video Converter Ultimate can be a great help for you.This DVD ripping software works as a professional DVD to YouTube converter that lets you get videos with optimized settings for uploading to YouTube. Besides, it can also convert DVD to video formats like AVI, WMV, FLV, M4V, MKV, MPG, etc and extract audio from DVD for playing and sharing anywhere. What's more, the built-in editor also allows you to extract DVD clips with the very part you want. If you want to rip DVD for uploading to YouTube on Mac OS X, you can use the equivalent Mac version DVD Ripper for Mac - Dimo Video Converter Ultimate for Mac. Now download the right version of the program and follow the guide below.Free Download Dimo Video Converter Ultimate (Win/Mac): Other Download:
How to Convert DVD to YouTube friendly Video1. Load DVD moviesInsert the DVD disc into your computer's DVD-ROM and run the DVD Ripper for YouTube. You can click the "Add DVD" button to load the DVD files to the program. DVD ISO/IFO, VIDEO_TS folder are supported also.
According to YouTube Help Center, H.264 video with AAC audio in MOV or MP4 format is preferred for uploading. Thus, to share DVD movies on YouTube, you need to rip DVD to YouTube H.264 MP4 or MOV first. Dimo Video Converter Ultimate can be a great help for you.This DVD ripping software works as a professional DVD to YouTube converter that lets you get videos with optimized settings for uploading to YouTube. Besides, it can also convert DVD to video formats like AVI, WMV, FLV, M4V, MKV, MPG, etc and extract audio from DVD for playing and sharing anywhere. What's more, the built-in editor also allows you to extract DVD clips with the very part you want. If you want to rip DVD for uploading to YouTube on Mac OS X, you can use the equivalent Mac version DVD Ripper for Mac - Dimo Video Converter Ultimate for Mac. Now download the right version of the program and follow the guide below.Free Download Dimo Video Converter Ultimate (Win/Mac): Other Download:
How to Convert DVD to YouTube friendly Video1. Load DVD moviesInsert the DVD disc into your computer's DVD-ROM and run the DVD Ripper for YouTube. You can click the "Add DVD" button to load the DVD files to the program. DVD ISO/IFO, VIDEO_TS folder are supported also.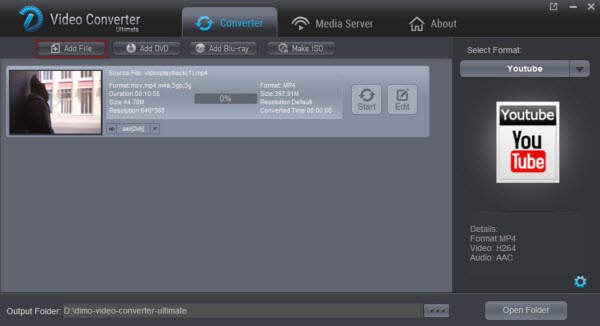 2. Specify output formatFrom the drop-down list of "Select Format", navigate to the "Format > Web" category. From the sub-category, choose YouTube or FLV as the output format.
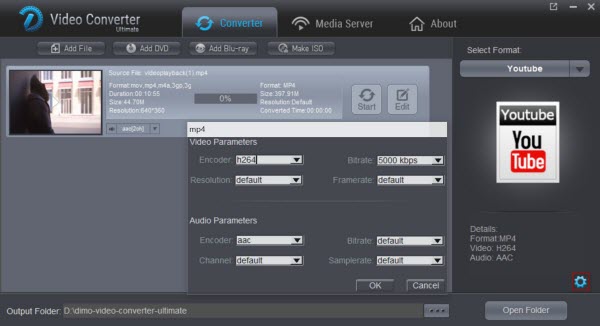 3. Split and Edit DVD moviesSince if your DVD video is longer than 15 minutes, YouTube will be unable to download it, you can click "Edit" icon and turn to "Trim" to clip your videos to a proper length with "Add Trim Marker" buttone. What's more, you can also edit the video with adding effect, watermark, crop and rotate as you like.4. Advanced settingsIf you wanna some advanced settings, you can click "Settings" icon to adjust the video, audio parameters bitare, frame rate, sample rate, audio channel, etc. Note: Keep in mind that videos must be less than 45 minutes long and smaller than 1.75 GB. You can modify the video settings and trim your video to get a decent file before uploading to YouTube.5. Start converting DVD to YouTubeWhen all these settings are ready, you can click the "Start" button to begin the DVD to YouTube conversion. When the ripping is done, you can click on "Open" button to locate the ripped videos. Now you can freely share the video files on your YouTube with more people.6. Add converted DVD files to YouTubea. Sign into YouTube.b. Click the Upload link at the top of the page.c. Select the video you'd like to upload from your computer. (Enter as much information about your video as possible, including Title, Description, Tags, and Category.)And what we have left is just to follow its instructions. Broadcast yourself now!Free Download or Purchase Dimo Video Converter Ultimate: Need the lifetime version to work on 2-4 PCs so that your friends and family can instantly broaden their entertainment options? Please refer to the family license here.
  Kindly Note:The price of Dimo Video Converter Ultimate for Windows is divided into 1 Year Subscription, Lifetime/Family/Business License: $43.95/Year; $45.95/lifetime license; $95.95/family license(2-4 PCs); $189.95/business pack(5-8 PCs). Get your needed one at purchase page.Related Software:BDmate (Win/Mac)Lossless backup Blu-ray to MKV with all audio and subtitle tracks; Rip Blu-ray to multi-track MP4; ConvertBlu-ray to almost all popular video/audio formats and devices; Copy Blu-ray to ISO/M2TS; Share digitized Blu-ray wirelessly.DVDmate (Win/Mac)A professional DVD ripping and editing tool with strong ability to remove DVD protection, transcode DVD to any video and audio format, and edit DVD to create personal movie.Videomate (Win/Mac)An all-around video converter software program that enables you to convert various video and audio files to formats that are supported by most multimedia devices.8K Player (Win/Mac)A mixture of free HD/4K video player, music player, Blu-ray/DVD player, video recorder and gif maker. Contact us or leave a message at Facebook if you have any issues.Related Articles:
Source: DVD to YouTube - How to Share and Upload DVD to YouTube
Kindly Note:The price of Dimo Video Converter Ultimate for Windows is divided into 1 Year Subscription, Lifetime/Family/Business License: $43.95/Year; $45.95/lifetime license; $95.95/family license(2-4 PCs); $189.95/business pack(5-8 PCs). Get your needed one at purchase page.Related Software:BDmate (Win/Mac)Lossless backup Blu-ray to MKV with all audio and subtitle tracks; Rip Blu-ray to multi-track MP4; ConvertBlu-ray to almost all popular video/audio formats and devices; Copy Blu-ray to ISO/M2TS; Share digitized Blu-ray wirelessly.DVDmate (Win/Mac)A professional DVD ripping and editing tool with strong ability to remove DVD protection, transcode DVD to any video and audio format, and edit DVD to create personal movie.Videomate (Win/Mac)An all-around video converter software program that enables you to convert various video and audio files to formats that are supported by most multimedia devices.8K Player (Win/Mac)A mixture of free HD/4K video player, music player, Blu-ray/DVD player, video recorder and gif maker. Contact us or leave a message at Facebook if you have any issues.Related Articles:
Source: DVD to YouTube - How to Share and Upload DVD to YouTube
This is a simple guide on how you can watch and stream your own DVD collection on Amazon Cloud fast, easy and hassle free by ripping DVD to Amazon Cloud.After 2012 Skyfall, Spectre creates another box office success (up to $900 million worldwide) and embraces overall possitive reviews. With the DVD version of Spectre 007 being new released, you have one more option to watch this fantastic action movie-watch Spectre 007 DVD movie. To share your Spectre DVD disc with all your family and friends, you can make full use of Amazon Drive cloud storage and make a digital copy of Spectre DVD onto Amazon Cloud so as the Spectre 007 DVD movie can be transferred to iPhone iPad Android, TV for unlimited movie experience. So how to upload Spectre DVD to Amazon Cloud? Searching high and low, I know that it's easy to do it as long as got a DVD Ripper in hand. Dimo Video Converter Ultimate for Mac is highly recommended here to fulfill your needs. It can professionally convert DVD to Amazon Cloud compatible MP4, MOV, AVI, WMV, FLV files with fast speed and excellent output quality on Mac (OS Sierra). In addition, this DVD Ripping software can also rip DVD to optimized video for playback on iPad, iPod, iPhone, Xbox, PS3, PS4, TV, VR, Android, FCP and more. With a built-in video editor, you are able to change the DVD movies according to your taste- add watermarks, rotate, crop, change video visual effects and even trim the long videos into multiple segments with short duration. The most important is that, it allows you to modify the video bitrate, frame rate, video size, audio channel, etc for your original large video clips for easier uploading. If you are a Windows user, please turn to Dimo Video Converter Ultimate to convert and upload DVD to Amazon Cloud on Windows PC (including Windows 10). Now download the right version of the program and follow the guide below.Free Download Dimo Video Converter Ultimate for Mac/Win: Other Download:
Guides about ripping Spectre DVD for uploading to Amazon CloudStep 1. Load Spectre DVD moviesInsert the Spectre DVD disc into your computer's DVD drive and run DVD Ripper. You can load the DVD movies by clicking "Add DVD" button on the top left. This DVD converter also supports ripping ISO and Video_ts folder.Tip: If you need to backupSpectre DVD with wanted audio track, you can click the drop down menu after "Audio" to select your desired tracks.
So how to upload Spectre DVD to Amazon Cloud? Searching high and low, I know that it's easy to do it as long as got a DVD Ripper in hand. Dimo Video Converter Ultimate for Mac is highly recommended here to fulfill your needs. It can professionally convert DVD to Amazon Cloud compatible MP4, MOV, AVI, WMV, FLV files with fast speed and excellent output quality on Mac (OS Sierra). In addition, this DVD Ripping software can also rip DVD to optimized video for playback on iPad, iPod, iPhone, Xbox, PS3, PS4, TV, VR, Android, FCP and more. With a built-in video editor, you are able to change the DVD movies according to your taste- add watermarks, rotate, crop, change video visual effects and even trim the long videos into multiple segments with short duration. The most important is that, it allows you to modify the video bitrate, frame rate, video size, audio channel, etc for your original large video clips for easier uploading. If you are a Windows user, please turn to Dimo Video Converter Ultimate to convert and upload DVD to Amazon Cloud on Windows PC (including Windows 10). Now download the right version of the program and follow the guide below.Free Download Dimo Video Converter Ultimate for Mac/Win: Other Download:
Guides about ripping Spectre DVD for uploading to Amazon CloudStep 1. Load Spectre DVD moviesInsert the Spectre DVD disc into your computer's DVD drive and run DVD Ripper. You can load the DVD movies by clicking "Add DVD" button on the top left. This DVD converter also supports ripping ISO and Video_ts folder.Tip: If you need to backupSpectre DVD with wanted audio track, you can click the drop down menu after "Audio" to select your desired tracks.  Step 2. Choose output formatClick "Select Format" bar and select the appropriate format. Since Amazon Cloud supports MP4, Quicktime, AVI, MTS, MPG, ASF, WMV, Flash, and OGG video/audio files, just select the one you need as the output format from "Format > Video" or "Format > HD Video" category. Or depends on your device, you can choose a suitable video format from "Device".Step 3. Advanced profile settingsSimply click Settings bar and you can tweak the settings to your satisfaction and even save it as preset. Please remember the file size is based more on bitrate than resolution which means bitrate higher results in bigger file size, and lower visible quality loss.
 Step 4. Edit/Split Spectre DVD movieClick Edit button and you can trim, crop or adjust the video with the built-in video editor to get the very part and effect of the movie you want.Tip: Keep in mind that Amazon Drive streaming is not available for videos longer than 20 minutes or larger than 2 GB, but these can be stored in Amazon Drive for you to download and watch offline. (See Amazon Drive Photos & Videos File Requirements)Step 4. Start rippingSpectre DVD to Amazon CloudAfter the above three steps, go back to the main interface and click the "Start" button to begin convertingSpectre DVD movies to Amazon Cloud highly compatible video files. Just copy the converted file to Amazon Cloud after the conversion process is complete. Enjoy.Note: Some file names are not compatible with Amazon Drive. If your file name contains incompatible characters, you will need to rename it before you can upload it.To upload photos and personal videos from your computer to Cloud Drive:1. Go to Amazon Cloud Drive.2. Click the Photos & Videos tab in the top navigation bar.3. Drag and drop files into the browser window, or click Upload and follow the onscreen instructions.Tip: After clicking Upload, you can use the Select Photos and Videos button to choose multiple files to upload. Uploading folders is not currently available within the Cloud Drive website.Your uploaded photos and personal videos are automatically available on the Cloud Drive Photos & Videos website, and are accessible from PC and Mac computers through a web browser. Choose to open and play the video using the Amazon Cloud player. Free Download or Purchase Dimo Video Converter Ultimate for Mac:
 Contact us or leave a message at Facebook if you have any issues.Related Articles:
Source: How can I Upload Spectre DVD to Amazon Cloud
Contact us or leave a message at Facebook if you have any issues.Related Articles:
Source: How can I Upload Spectre DVD to Amazon Cloud
Want to edit DVD movies in Avid Media Composer (Avid Media Composer 8)? Simply follow this article to convert and import DVD to Avid MC on Mac (OS Sierra).There are occasions that you need to import footage on DVD to Avid Media Composer 8/7/6/5 for further editing. However, DVD videos does not natively work within Avid MC. In order to bring DVD to Avid Media Composer, DVD video files must be ripped off disc and then converted. This process works to rip DVD video for use in Avid MC. To rip DVD for Avid easily and quickly, Dimo Video Converter Ultimate for Mac is highly recommended. By runing it, there is no need to set the codec yourself, the program has an optimized preset for Avid MC. In addition, it also exports some advanced encoders like DNxHD, Apple Intermediate Codec, ProRes, MPEG-2, allowing to convert DVD to seamlessly fit Avid Media Composer, iMovie, Final Cut Pro, Adobe Premiere, etc. on macos Sierra. If you're using a Windows PC, please turn to Dimo Video Converter Ultimate (Windows 8.1/10 compatible), which has the same function as the Mac version. Now download the right version and follow the tips below to finish your task.Free Download Dimo Video Converter Ultimate for Mac/Win: Other Download:
How to Convert and Import DVD clips into Avid Media ComposerStep 1. Load DVD moviesInsert the DVD disc into your DVD-ROM and click "Add DVD" icon to import the DVD movies. In addition, click the main file of DVD movies (the longest one) you can select the audio track as you like. Not only DVD, but also Blu-ray, MP4, MKV, MOV or other SD/HD/4K videos are supported.
To rip DVD for Avid easily and quickly, Dimo Video Converter Ultimate for Mac is highly recommended. By runing it, there is no need to set the codec yourself, the program has an optimized preset for Avid MC. In addition, it also exports some advanced encoders like DNxHD, Apple Intermediate Codec, ProRes, MPEG-2, allowing to convert DVD to seamlessly fit Avid Media Composer, iMovie, Final Cut Pro, Adobe Premiere, etc. on macos Sierra. If you're using a Windows PC, please turn to Dimo Video Converter Ultimate (Windows 8.1/10 compatible), which has the same function as the Mac version. Now download the right version and follow the tips below to finish your task.Free Download Dimo Video Converter Ultimate for Mac/Win: Other Download:
How to Convert and Import DVD clips into Avid Media ComposerStep 1. Load DVD moviesInsert the DVD disc into your DVD-ROM and click "Add DVD" icon to import the DVD movies. In addition, click the main file of DVD movies (the longest one) you can select the audio track as you like. Not only DVD, but also Blu-ray, MP4, MKV, MOV or other SD/HD/4K videos are supported.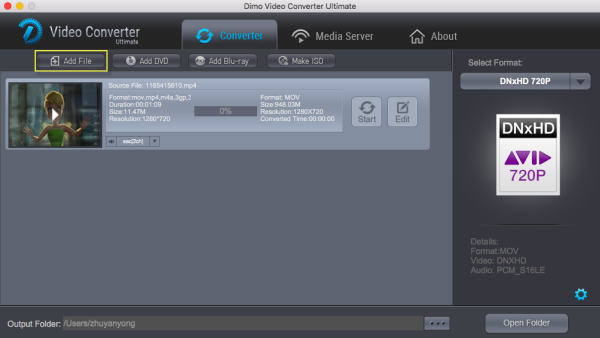 Step 2: Select output formatClick "Select Format" bar and choose "Editor > DNxHD 720P or DNxHD 1080P" from the pull down menu.Step 3: Start to rip DVD movies to DNxHD MOVTap "Start" button to start the DVD to Avid MC conversion under macos Sierra. After the conversion, importing the ripped video files to Avid Media Composer should be smooth and simple .Extra Tips:a. Adjust the video and audio parameters, including the Bitrate of Video & Audio, Video Size, Sample Rate, Frame Rate, Audio Channels, etc., by clicking the Settings button on the main interface for getting the best quality before starting conversion.
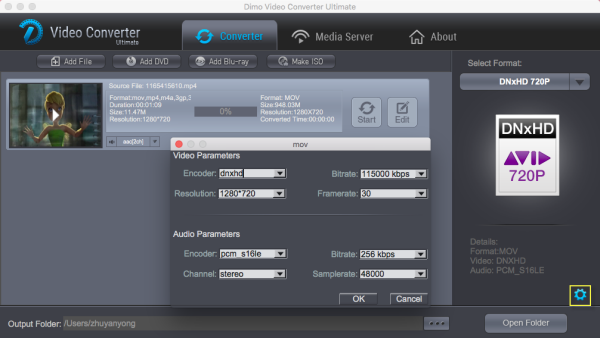 b. This DVD to DNxHD Converter Mac offers optimized DVD video editing functions, empowering user to crop video file size, trim video segment, add watermark/effects and so on to realize different needs.c. After editing, you can convert and share Avid MC exported video files on mobile devices.Free Download or Purchase Dimo Video Converter Ultimate for Mac/Win: Need the lifetime version to work on 2-4 Macs so that your friends and family can instantly broaden their entertainment options? Please refer to the family license here. Kindly Note:The price of Dimo Video Converter Ultimate for Mac is divided into 1 Year Subscription, Lifetime/Family/Business License: $43.95/Year; $45.95/lifetime license; $95.95/family license(2-4 Macs); $189.95/business pack(5-8 Macs). Get your needed one at purchase page.Related Software:BDmate (Mac/Win)Lossless backup Blu-ray to MKV with all audio and subtitle tracks; Rip Blu-ray to multi-track MP4; Convert Blu-ray to almost all popular video/audio formats and devices; Copy Blu-ray to ISO/M2TS; Share digitized Blu-ray wirelessly.DVDmate (Mac/Win)A professional DVD ripping and editing tool with strong ability to remove DVD protection, transcode DVD to any video and audio format, and edit DVD to create personal movie.Videomate (Mac/Win)An all-around video converter software program that enables you to convert various video and audio files to formats that are supported by most multimedia devices.8K Player (Mac/Win)A mixture of free HD/4K video player, music player, Blu-ray/DVD player, video recorder and gif maker. Contact us or leave a message at Facebook if you have any issues.Related Articles:
Source: How to Rip and Import DVD into Avid Media Composer
b. This DVD to DNxHD Converter Mac offers optimized DVD video editing functions, empowering user to crop video file size, trim video segment, add watermark/effects and so on to realize different needs.c. After editing, you can convert and share Avid MC exported video files on mobile devices.Free Download or Purchase Dimo Video Converter Ultimate for Mac/Win: Need the lifetime version to work on 2-4 Macs so that your friends and family can instantly broaden their entertainment options? Please refer to the family license here. Kindly Note:The price of Dimo Video Converter Ultimate for Mac is divided into 1 Year Subscription, Lifetime/Family/Business License: $43.95/Year; $45.95/lifetime license; $95.95/family license(2-4 Macs); $189.95/business pack(5-8 Macs). Get your needed one at purchase page.Related Software:BDmate (Mac/Win)Lossless backup Blu-ray to MKV with all audio and subtitle tracks; Rip Blu-ray to multi-track MP4; Convert Blu-ray to almost all popular video/audio formats and devices; Copy Blu-ray to ISO/M2TS; Share digitized Blu-ray wirelessly.DVDmate (Mac/Win)A professional DVD ripping and editing tool with strong ability to remove DVD protection, transcode DVD to any video and audio format, and edit DVD to create personal movie.Videomate (Mac/Win)An all-around video converter software program that enables you to convert various video and audio files to formats that are supported by most multimedia devices.8K Player (Mac/Win)A mixture of free HD/4K video player, music player, Blu-ray/DVD player, video recorder and gif maker. Contact us or leave a message at Facebook if you have any issues.Related Articles:
Source: How to Rip and Import DVD into Avid Media Composer